
0
Owner's of the Cuisinart Oven TOB-155 gave it a score of 0 out of 5. Here's how the scores stacked up:


7
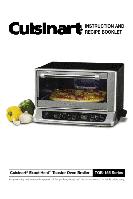
TIMER
First set oven to bake or broil.
Once the oven has reached temperature, place
the item in the center of the rack and close the
door (exception: when broiling keep door ajar).
Press the Timer button. Press and hold the Hour
button to increase the hours. The total maximum
cook time is 4 hours. Press and hold the Min
button to increase minutes. The set time will
blink five times and then stop blinking. Once it
stops blinking, the Timer is set and will begin to
count down. You do not need to press the Timer
button again.
Note: If you do press the Start/
Stop button and you have already started the
oven, the oven will turn off.
If while setting the timer you set the incorrect
time, press the Timer button once to clear the
timer to 0:00, then begin again to set the correct
time. If the timer has been set and is counting
down, the timer can be reset to 0:00 by pressing
the timer button two times. The display will
begin to blink to let you know you can enter the
correct time.
At the end of timer setting, the timer will ring
continuously until it is turned off. To stop timer
ring, press timer button. Pressing Start/Stop can
turn off both the timer and oven.
To view the temperature setting while the timer
is running, press the Temp button. The oven
temperature will be displayed on the clock for 5
seconds. After 5 seconds the display will return
to the timer countdown without interruption.
This can be done only while using the bake
function. It will not work with the broil function.
The broil function is set to 500ºF.
IMPORTANT NOTES ON OVEN USE
The Bake feature is always used with the Temp
selection button.
The Broil button has only one temperature
(preset to 500ºF) so it cannot be used with the
Temp button.
The timer can be used only with the bake or
broil functions.
TOAST
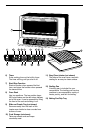
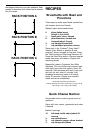
To toast, make sure the oven rack is in rack
position B, as indicated in the diagram on page
11. If toasting two items, center them in the
middle of the rack. Four or six items should be
evenly spaced – two/three in front, two/three in
back. Close the glass door.
Press the Toast button and the Start/Stop
button to toast.
The default is set to 2 slices of medium toast
(Browning Selection number 4) using standard
white bread.
To select a browning shade, press the Toast
button and then the Up arrow for darker toast or
the Down arrow for lighter toast. You have seven
browning selection shades to choose from. Your
browning selection is indicated by the black
dots located at the bottom of the clock display.
The row of dots will shrink for lighter shades and
grow for darker shades. The browning number
you have selected will also be displayed on the
clock.
Your browning selection will remain in the
memory of the oven until you change it or
unplug the oven. When you unplug the oven,
the browning selection will automatically return
to number 4, medium brown setting.
When toasting, the toasting time will count
down on the clock display. The timing will be
different for each custom setting you choose.
Keep in mind that the timing is adjusted by the
oven thermostat. So if your oven is already
warm, the toasting time will be less than if you
start with a cold oven.
BROWNING SELECTION
To make lighter toast, first press the Toast
button and then the Down arrow located to the
bottom left of the toast button. Each time you
press this arrow, the browning selection will get
lighter by one setting.
To make darker toast, press the Up arrow
located to the top left of the toast button. Each
time you press this arrow, the browning
selection will get darker by one setting.
The browning level selected will appear at the
bottom of the clock window by the numerical
and LCD display.
Desired Color LCD Light Position
Light Setting 1 or 2
Medium Setting 3, 4, or 5
Dark Setting 6 or 7


Find Your Products By Category
Please Login
