

0
Owner's of the Audio-Technica Turntable AT-LP60-USB gave it a score of 0 out of 5. Here's how the scores stacked up:

English
Initial Setup (continued)
55
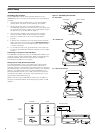
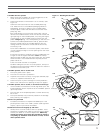
Automatic Operation
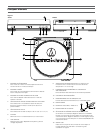
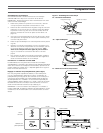
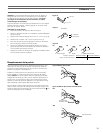
1. Remove the stylus guard from the stylus assembly (Fig. 4).
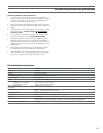
2. Put a record on the turntable. If needed, use the 45 RPM
adapter (Fig. 5).
3. Select the size of record: 12" or 7" (Fig. 6).
4. Select the speed: 33
1
/
3
RPM or 45 RPM (Fig. 7).
5. Start: Gently push the START button (Fig. 8a). The turntable
will start and the tone arm automatically will move to the lead-
in groove. When the record has finished playing, the tone arm
will automatically return to the tone arm rest and the turntable
will shut off.
6. Stop: To stop playing the record before it reaches the end,
press the STOP button (Fig. 8b). The tone arm will lift and
return to the tone arm rest, and the turntable will shut off.
7. Pause: To pause the record before it has completed playing,
press the tone arm Lift button (Fig. 8c). Press the Lift button
again to continue playing the record.
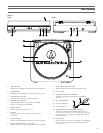
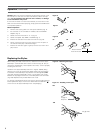
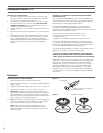
Connecting to Stereo System
1. Connect the red RCA-type pin-plug to the right channel input
and the white RCA-type pin-plug to the left channel input of
your stereo system (Fig. 3, page 4).
2. With the tone arm still fastened to the tone arm rest, slowly
turn the turntable platter clockwise ten times, to make certain
the automatic mechanism is fully cycled.
3. Remove the vinyl tie that holds the tone arm on its rest.
4. Connect the power cord plug to an AC outlet.
5. NOTE: You do not need to disconnect your turntable from
your stereo system in order to connect it to a computer via
the USB port. This allows you to monitor your recordings
when using recording software. See software guide for further
information.
Connecting to Computers or Audio Devices with 3.5 mm Input
The AT-LP60-USB connects without adapters to devices equipped with
RCA connectors. For maximum flexibility, we have included two adapter
cables to fit other popular audio inputs.
The first of these adapter cables-dual RCA to stereo 3.5 mm mini-plug
(male)-is designed to fit most popular computer* audio inputs. It may
also be used to connect the turntable’s RCA output to other equipment,
including:
• a stereo/boombox* equipped with a 3.5 mm mini input
• powered speakers* equipped with a 3.5 mm mini input
• a mixer* or PA system* equipped with a 3.5 mm mini jack
The second included adapter cable–dual RCA to stereo 3.5 mm mini-
plug (female)–permits connection of the turntable output to amplified
speakers* or similar devices. The 3.5 mm stereo minijack on the cable
adapter accepts stereo mini-plugs.
To use either adapter cable, connect the turntable’s red and white RCA-
type plugs to the cable adapter’s RCA-type jacks.
* When using either cable adapter, always set the AT-LP60-USB
turntable’s Pre-amp Selector Switch to the “LINE” position.
(Switch is located on the back of the turntable.)
NOTE: If connection is desired to a mono amplifier/speaker, make
certain to use a stereo-to-mono adapter, available from your dealer or
an electronic parts store. Inserting a mono plug in the stereo jack will
disable one of the stereo channels. Other adapter cable configurations
will be available from dealers and parts stores for connecting to devices
needing different terminations.
Figure 4
Stylus assembly
Stylus (“Needle”)
Stylus guard
Figure 5
45 RPM adapter
Operation


Find Your Products By Category
Please Login
