

5.0
Owner's of the Cuisinart Blender BFP-10CH gave it a score of 5.0 out of 5. Here's how the scores stacked up:


3
25. Wash the blender jar, food processor work bowl, food
processor chopping blade, locking ring, and covers before
first use.
26. WARNING: TO REDUCE THE RISK OF ELECTRICAL SHOCK
OR FIRE, DO NOT REMOVE THE BASE PANEL. NO USER
SERVICEABLE PARTS ARE INSIDE. REPAIR SHOULD BE
DONE ONLY BY AUTHORIZED PERSONNEL.
27. WARNING: FLASHING LIGHT INDICATES READY TO
OPERATE. DO NOT TOUCH BLADES.
SAVE THESE INSTRUCTIONS
FOR HOUSEHOLD USE ONLY
NOTICE
This appliance has a polarized plug (one prong is wider than the
other). To reduce the risk of electric shock, this plug will fit into a
polarized outlet only one way. If the plug does not fit fully into the
outlet, reverse the plug.
If it still does not fit, contact a qualified electrician. Do not modify
the plug in any way.
Maximum rating of 600 watts is based on the jar attachment, which
draws the greatest power. Other recommended attachments may
draw significantly less power.
This unit comes with a resettable thermal fuse to prevent damage
to the motor in the case of extreme overload. Simply unplug the
unit, rest it for 15 minutes and continue.
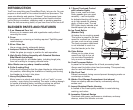
UNPACKING INSTRUCTIONS
1. Place the gift box containing your Cuisinart
®
PowerBlend Duet
™
on a flat, sturdy surface before unpacking.
2. Remove the instruction booklet and other printed material from
top of corrugated insert.
3. Next, remove the top corrugated insert containing the fill cap.
4. Carefully lift the blender base from box and set aside.
5. Carefully lift the top corrugated insert of the food processor
accessory. It containing the adapter stem, and slicing/shredding
disc. Carefully remove slicing /shredding disc as it is very sharp,
then remove adapter stem.
6. Remove the bottom corrugated insert containing the blender jar
assembly. Be careful not to tip the jar when removing.
7. Last, remove any additional literature from the box.
CONTENTS
Important Safeguards . . . . . . . . . . . . . . . . . . . . . . . . . . . . . . . . . 2
Unpacking Instructions . . . . . . . . . . . . . . . . . . . . . . . . . . . . . . . . 3
BLENDER
Parts and Features . . . . . . . . . . . . . . . . . . . . . . . . . . . . . . . . . 4
Assembly . . . . . . . . . . . . . . . . . . . . . . . . . . . . . . . . . . . . . . . . 5
Helpful Reminders. . . . . . . . . . . . . . . . . . . . . . . . . . . . . . . . . . 5
Operating Instructions . . . . . . . . . . . . . . . . . . . . . . . . . . . . . . 5
Quick Reference Guides . . . . . . . . . . . . . . . . . . . . . . . . . . . . 6
Cleaning and Care. . . . . . . . . . . . . . . . . . . . . . . . . . . . . . . . . . 7
Dos and Don’ts . . . . . . . . . . . . . . . . . . . . . . . . . . . . . . . . . . . 7
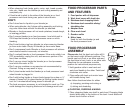
FOOD PROCESSOR
Parts and Features . . . . . . . . . . . . . . . . . . . . . . . . . . . . . . . . . 8
Assembly. . . . . . . . . . . . . . . . . . . . . . . . . . . . . . . . . . . . . . . . . 8
Operating Instructions . . . . . . . . . . . . . . . . . . . . . . . . . . . . . . 9
Adding Food While Processing. . . . . . . . . . . . . . . . . . . . . . . 10
Removing Processed Food . . . . . . . . . . . . . . . . . . . . . . . . . 10
Cleaning and Storing. . . . . . . . . . . . . . . . . . . . . . . . . . . . . . . 11
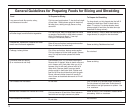
Guidelines for Preparing Foods for Chopping . . . . . . . . . . . 11
Guidelines for Preparing Foods for Slicing and Shredding . 12
Warranty. . . . . . . . . . . . . . . . . . . . . . . . . . . . . . . . . . . . . . . . . . . 13


Find Your Products By Category
Please Login
