
0
Owner's of the Cuisinart Blender PowerEdge gave it a score of 0 out of 5. Here's how the scores stacked up:


5
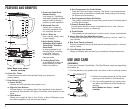
4. Secure the rubber gasket and cutting assembly into position by placing
the smaller opening of the locking ring (d) on top of the cutting assembly.
Engage threads by twisting the locking ring clockwise until tightened.
Make sure locking ring is tightly fastened to blender jar. Once assembled,
turn the blender jar right-side up.
5. Push the cover on to the top of the blender jar. Make sure the triangle
icon/symbol is aligned with the pour spout. Push the measured pour lid
into the cover.
6. Place the blender jar on the motor base so that the jar markings are
facing you and the handle is positioned to one side.
7. Plug in the power cord. Your blender is now ready to be used.
HELPFUL REMINDERS
• Oncethecoverisinposition,additionalingredientscanbeaddedduring
blending by simply lifting the measured pour lid, adding ingredients, and
replacing the measured pour lid.
• Covershouldalwaysbeinplacewhiletheunitison.Makesurethecover
is properly aligned.
• Warning: Do not place blender jar onto base while motor is running.
• Donottwistlockingringfromblenderjarwhenremovingblenderjarfrom
base. Simply lift blender jar from motor base.
• Addliquidingredientsfirst,thenfollowwithsolidingredients.Thiswill
provide more consistent blending and prevent unnecessary stress on
the motor.
• Donotplaceice,frozenfoodsorverycoldliquidsintoablenderjarthat
has come directly from a hot dishwasher.
• Boilingliquidsshouldcoolfor5minutesbeforebeingplacedin
blender jar.
• FollowCleaningandMaintenanceinstructionsonpage7priortoyour
first use.
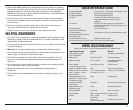
QUICK REFERENCE GUIDE
To activate blender Press On/Off – The blender is in Standby mode.
To begin blending Press desired speed button.
To change speeds Press desired speed button.
To pulse Press On/Off, then Pulse, then press
and release desired function button as
needed.
To crush ice Press On/Off, then, press Ice Crush button
and program will begin. Ice Crush program runs
for three cycles.
To stop blending Press On/Off button.
(and deactivate blender)
To stop blending Press same function key under operation again.
(during a designated function
and pause timer)
To stop blending in Pulse Release function button.
To stop blending in Ice Crush mode Press Ice Crush button again.
SPEED SELECTION GUIDE
Refer to this guide to choose the best speed for your desired result.
Ingredient/Recipe Speed Result
Reconstitutingfrozen Low Smoothandfull-bodied
juice concentrate
Mayonnaise Soups & Sauces Thick and creamy
Salad dressings Low or Purée Completely blended
and emulsified
Nuts (shelled, Pulse High to chop Coarse to fine
½ cup or less at a time)
Heavy or whipping cream High Thick, creamy topping
Bread, cookies or crackers Low – pulse to break Coarse to fine as desired
(add ½" pieces, 1 cup or up, then run on Low
less at a time)
Grating/chopping citrus High Uniformly fine
zest(add1to2tsp.sugar
or salt from recipe)
Smoothies, shakes, Smoothie Smooth, creamy and thick
health drinks
Baby food/fruit and Purée Smooth and creamy
vegetable purée
Frozencocktails IceCrush Thickandslushy
Hard cheeses
High – pulse, then blend
Coarse to fine
Spices High – pulse, Coarse to fine
then blend
Ice Ice Crush, Coarse crush to snowy
pulse or continuous


Find Your Products By Category
Please Login
