

5.0
Owner's of the Cuisinart Blender DLC-2009CHB gave it a score of 5.0 out of 5. Here's how the scores stacked up:
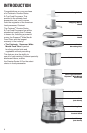


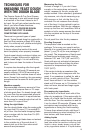
THE MACHINE
INCLUDES:
1. Housing base with a vertically
projecting shaft and convenient
touchpad control panel
2. 9-cup work bowl
3. Cover with Cuisinart
®
Supreme Wide
Mouth Feed Tube
4. Pusher assembly that slides inside the
feed tube
5. Dough blade
6. Sharp metal chopping/mixing blade
7. Serrated slicing disc
8. Shredding disc
9. Detachable stem for discs (not shown)
10. Plastic spatula (not shown)
The metal chopping blade chops raw and
cooked fruits, vegetables, meat, sh and
cheese to the exact consistency you want,
from coarse to ne, even to a purée. It
chops nuts, makes nut butters, mayon-
naise and sauces, and mixes tender, aky
pastry. The metal chopping blade also
mixes cakes, frostings, cookies, quick
breads, muf ns, and biscuits.
The slicing disc makes beautiful whole
slices without torn edges. It slices whole
fruits and vegetables, cooked meat,
semi-frozen raw meat and loaves of bread.
The shredding disc processes most rm
and hard cheeses into long, attractive
shreds. It also shreds vegetables like pota-
toes, carrots and zucchini, and processes
nuts and chocolate to a grated texture.
The detachable stem ts both discs, mak-
ing disc storage compact in limited space.
The pusher assembly has two parts.
1. A small, removable, clear pusher that ts
into a small center-located feed tube.
This tube is for narrow food like carrots,
for adding liquid, and for continuous
feeding of small food like garlic.
2. A large pusher that ts into the Cuisinart
®
Supreme
®
feed tube opening and moves
freely within it.
Upon contact, the large pusher meets an
activating rod in the center of the work bowl
handle, permitting the motor to start.
ASSEMBLY
INSTRUCTIONS
Blade Operation
1. Plug in the housing base and place the
work bowl on top, with the work bowl
handle just to the left of center. Turn the
work bowl counterclockwise to lock it
onto the housing base.
2. Carefully lift and place the chosen blade
over the work bowl center shaft. Line up
the markings on the blade hub with the
motor shaft. Blade should t snugly and
rest on the bottom of the work bowl.
3. Add desired ingredients to work bowl.
4. Place work bowl cover on work bowl, with
the handle area just to the left of center.
Turn counterclockwise to lock onto work
bowl.
5. Align pusher assembly and activating rod
with the feed tube opening on the work
bowl cover and slide the activating rod
down to the bottom.
6. You are now ready to operate the
machine.
Disc Operation
1. Plug in the housing base and place the
work bowl on top, with the work bowl
handle just to the left of center. Turn the
work bowl counterclockwise to lock it
onto the housing base.
2. Choose desired disc and place
underside-up on tabletop. Pick up
detachable disc stem and align it with
the raised plastic crescent on the disc
underside. The raised ‘lock’ indicator on
the left corner of the stem should be to
the left of the mounting plate on disc.
3. Turn the stem to the right, so the locking
tabs are covered by the metal supports
and a ‘click’ locks the stem in place.
7


Find Your Products By Category
Please Login
