
5.0
Owner's of the Cuisinart Blender DLC-2009CHB gave it a score of 5.0 out of 5. Here's how the scores stacked up:
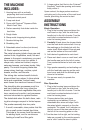


4. With the stem facing down, place the
assembly over the center hub. It should
t snugly and rest on the bottom of the
work bowl.
5. Place work bowl cover onto work bowl,
with the handle area just to the left of
center. Turn counterclockwise to lock
onto work bowl.
6. Align pusher with the feed tube opening
on the work bowl cover and slide the
activating rod down to the bottom.
7. Use the cord wrap on the housing base
underside to add or remove cord.
8. You are now ready to operate the machine.
MACHINE FUNCTIONS
PULSE
1. With the machine properly assembled
and engaged, and ingredients in the work
bowl, press the PULSE button repeatedly
as needed.
ON (Continuous)
1. Properly assemble and engage the
machine.
2. To add ingredients through the feed tube,
remove the pusher and ll the feed tube
as directed (see Preparing Food for
Slicing or Shredding, page 12).
3. Engage the pusher and press the ON
button. The button light will turn on and
the motor will start.
4. Press the pusher rmly down until all
ingredients have passed into the work
bowl. Remove the pusher and re ll
ingredients as needed.
When you engage the pusher again, the unit
will automatically turn on.
5. Press the OFF button when nished.
OPERATING
INSTRUCTIONS
Try chopping some practice foods, such
as a zucchini or potato, before you process
food to eat. First, cut the ingredients into
1-inch pieces.
• Place the work bowl over the center stem,
with the handle area just to the left of
center. Turn counterclockwise to lock in
place.
• Insert the metal chopping blade and put
ingredient pieces in the work bowl. Put
on the cover and turn counterclockwise
to lock onto work bowl. Align the pusher
and the pusher’s activating rod with the
corresponding openings on the feed tube,
and push all the way down.
• Press and release the PULSE button two
or three times. Each time the blade stops,
let the pieces drop to the bottom of the
bowl before you pulse again. This puts
them in the path of the blade each time
the motor starts.
• Using the pulse/chopping technique, you
get an even chop without overprocessing.
Check the texture frequently by looking
through the cover. If you want a ner
chop, press and release the PULSE
button until you achieve the desired
texture.
Onions and other food with a high water
content will quickly end up as a purée, unless
examined through the work bowl after each
pulse to make sure they are not overpro-
cessed.
Try chopping other food like meat for ham-
burger or sausage. Then make mayonnaise,
pastry or bread, as described in the following
sections.
To obtain consistent results:
Be sure all the pieces you add to the bowl
are about the same size.
Be sure the amount you process is no larger
than recommended on the inside cover of
this booklet.
Before you do anything, wait for the blade to
stop spinning. Once it does, turn the cover
clockwise to unlock, and remove by lifting it
off.
Remove the bowl from the base of the ma-
chine before removing the blade. This creates
a seal to prevent food from leaking. Turn the
bowl clockwise to unlock from the base, and
lift straight up to remove.
8


Find Your Products By Category
Please Login
