
0
Owner's of the Pioneer DJ Equipment Pioneer DJ Equipment gave it a score of 0 out of 5. Here's how the scores stacked up:
13
En
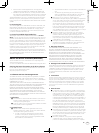
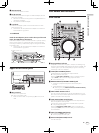
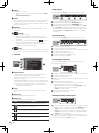
Connections and part names
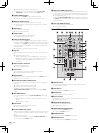
9 FX CH SELECT control
Switches the channel to which the effect is applied.
= Using the effect function (p.29)
a MASTER LEVEL control
Adjusts the master sound level output.
b EFFECT SELECT control
Selects the type of effect.
= Using the effect function (p.29)
c PARAMETER control
Adjusts the parameters provided for the various effects (time, har-
monics etc.).
= Using the effect function (p.29)
d HEADPHONES MIXING control
Adjusts the monitor volume balance between the sound of channels
for which the headphones [CUE] button is pressed and the sound of
[MASTER OUT 1] and [MASTER OUT 2].
= Monitoring sound with headphones (p.27)
e LEVEL/DEPTH control
Adjusts the quantitative parameter of the effect.
= Using the effect function (p.29)
f Channel level indicator
g FX ON/OFF button
Turns the effect on/off.
= Using the effect function (p.29)
h TAP button
The BPM used as the base value for the effect is calculated by the
interval at which the button is tapped with a finger.
= Setting the BPM manually (p.29)
i C.F. REV indicator
Lights when the [C.F. REV] switch is set to [ON].
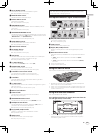
j FADER START switch
These turn the fader start function on/off.
= Starting playback using the fader (Fader Start) (p.28)
k Crossfader curve selector switch
This switches the crossfader curve characteristics.
= Selecting the crossfader curve characteristics (p.27)
l Crossfader
Switches between the audio output of the left and right decks.
= Outputting sound (p.27)
m C.F. REV switch
Reverses the deck to which the crossfader is assigned from right to
left and vice versa.
= Using the crossfader reverse function (p.28)
n Master level indicator
o Channel fader
Adjusts the sound level output from the various decks.
= Outputting sound (p.27)
p HEADPHONES LEVEL control
Adjusts the audio level output from the [PHONES] terminal.
q Headphones CUE button
The sound of decks for which the headphones [CUE] button is
pressed can be monitored over headphones.
= Monitoring sound with headphones (p.27)
r EQ (HI, MID, LOW) controls
Boosts or cuts frequencies for the different channels.
= Equalization (p.27)
s TRIM control
Adjusts the individual channel output gain.
= Outputting sound (p.27)
Do not pull on the channel fader and crossfader knobs with excessive
force. The knobs are not designed to be removed. Pulling the knobs
strongly may result in damaging the unit.
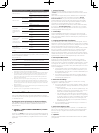
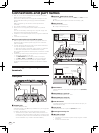
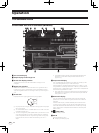
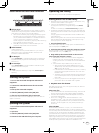
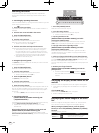
Microphone/External input control section
LEVEL
MAXMIN
OFF ON
TALK
OVER
MIC 1
LOW
MAXMIN
MID
EQ
MAXMIN
HI
MAXMIN
MIC 1
LEVEL
MAXMIN
OFF ON
TALK
OVER
MIC 2 / AUX
LOW
MAXMIN
MID
EQ
MAXMIN
HI
INPUT
SELECT
MAXMIN
AUXMIC 2
1 23 4
1 OFF, ON, TALK OVER selector switch
Turns the microphone on/off.
= Using a microphone (p.28)
2 LEVEL control
Adjusts the level of the output sound.
3 EQ (HI, MID, LOW) controls
Boosts or cuts frequencies in order to change the quality of the
sound.
4 MIC2/AUX selector switch
Switches the audio input between the microphone and the external
device.
! [MIC2]: Selects the microphone connected to the [MIC2]
terminal.
! [AUX]: Selects the external device connected to the [AUX IN]
terminals.
= Using a microphone (p.28)
= Using an external device (p.28)
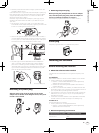
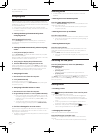
Using the LAPTOP DOCK
The computer’s keyboard section can be stowed under this unit.
! Depending on the size of your (notebook) computer, the keyboard
section may not fit in the LAPTOP DOCK.
! Install in such a way that the computer unit does not touch this unit.
! Install in such a way that the cables connected to the computer are
not stuck under this unit.
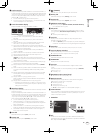
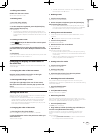
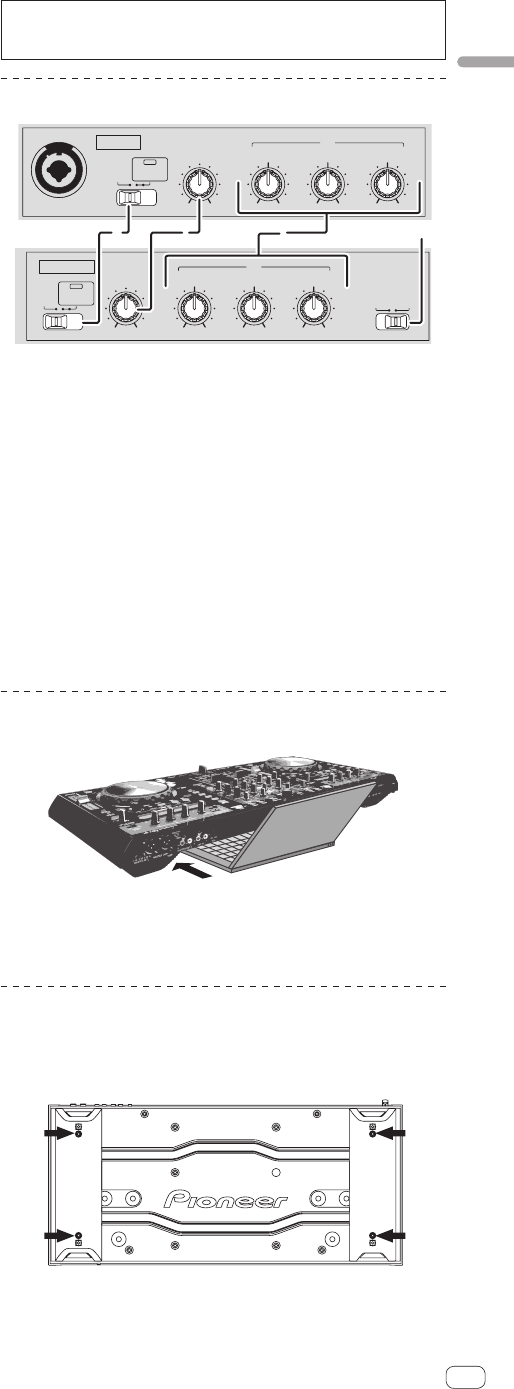
Using with the feet removed
This unit’s two feet can be removed.
Use a Phillips screwdriver to remove the screws from the
left and right feet (2 screws each).
DJ CONTROLLER
DDJ-S1
! The screws you have removed will be needed when mounting
the feet. Be careful not to lose them. The feet cannot be properly
mounted using other screws.


Find Your Products By Category
Please Login
