
0
Owner's of the Pioneer DJ Equipment Pioneer DJ Equipment gave it a score of 0 out of 5. Here's how the scores stacked up:

18
En
For details, see the URL below.
http://whitelabel.net/
Analyzing files
This function is operated not on the DDJ-S1 but on the computer.
Before you play your music in ITCH it is very important to analyze your
files first. The analyze files function processes the tracks in your library
to detect file corruption, prepare the waveform overviews, and if enabled
calculate the BPM values.
! This is function is performed in ITCH while in the offline player.
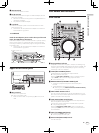
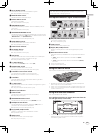
! For details on the positions of keys, see Screen when this unit is not
connected on page 17.
Setting the beat grid automatically when
analyzing tracks
Click [Set Beatgrid] to check it.
When [Set Beatgrid] is checked, the beat position is automatically
analyzed when analyzing the track and the beat grid is attributed
automatically.
Setting the BPM automatically when analyzing
tracks
1 Click [Set auto bpm] to check it.
When [Set auto bpm] is checked, the BPM is automatically analyzed
when the track is analyzed.
When ITCH determines that the analyzed BPM information is accurate,
the BPM information is written into the music file.
2 Click [range] to display the pull-down menu.
3 Click the BPM analysis range you want to set.
Specifying the BPM analysis range from the [range] pull-down menu
avoids having the track analyzed with an erroneous BPM value. When
[Set auto bpm] is checked, set the BPM analysis range if you know
more or less the BPM value of the track you want to analyze.
Analyzing all tracks
1 Disconnect this unit from the computer.
2 Click [ANALYZE FILES].
All the tracks in the library are analyzed.
To re-analyze all the tracks, click [ANALYZE FILES] while pressing the
computer’s [Ctrl] key.
Analyzing individual tracks or crates
1 Disconnect this unit from the computer.
2 Drag and drop the track or crate to [ANALYZE FILES].
! Even music files that have not been added to the library can be
analyzed by dragging and dropping them. Once analysis is com-
pleted, the music files are automatically added to [All...] in the
crate list panel.
! Tracks and crates that have already been analyzed can be re-
analyzed by dragging and dropping them to [ANALYZE FILES].
If a file is damaged or an error occurs
Status icons are displayed to the left of the tracks displayed in the library.
When the cursor is hovered over that icon, there will be an error mes-
sage displayed in the status bar.
! For details on the contents of the displayed errors, see File corruption
messages on page 34.
Selecting items
! To select the item, you can also use the computer’s mouse and
keyboard.
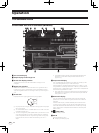
Moving the cursor between panels
Press the [AREA MOVE (REC)] button.
When the [AREA MOVE (REC)] button on this unit is pressed, the cursor
moves from panel to panel.
! The cursor can also be moved between panels by pressing the
computer’s [Tab] key.
Moving the cursor up and down
Turn the rotary selector.
The cursor moves up and down when this unit’s rotary selector is turned.
! The cursor can also be moved up and down by pressing the [a] or
[b] key on the computer.
Moving between layers
Press the rotary selector.
If there are further layers under the currently selected item, the cursor
moves down to the next layer down when this unit’s rotary selector is
pressed.
Press the [BACK] button to move back to the layer above.
! The cursor can also be moved using the [c] and [d] keys on the
computer.
Switching the sub panel
Press the [FILES] button (or either the [BROWSE] or
[PREPARE] button).
! [Files] panel
Used when importing tracks.
! [Browse] panel
Used to narrow down imported tracks by genre, BPM, etc.
! [Prepare] panel
Used to select and prepare tracks you want to play ahead of time.
The [History] panel is displayed when the [History] tab on the com-
puter’s screen is clicked. The [History] panel records and displays the
track playing history.
Editing crates
Creating a crate
Click
(brown) at the bottom of the crate list panel.
A new crate is added to the crate list panel.
! When a folder in which music files are stored is dragged and
dropped in the crate list panel, that folder becomes a crate
including all the tracks in it and the tracks are also added to the
library.
! A track or group of tracks can be dragged on to the crate list
panel and a crate will be created containing these.
! When one or multiple tracks is/are dragged to
(brown), a
crate including this/these tracks can be created.
Changing the crate layer
Crates and subcrates can be move to different layers.
Drag and drop crate in another crate.
When a crate is dragged and dropped in another crate, it becomes a
subcrate.
! Crate with the same name cannot be placed on the same layer.


Find Your Products By Category
Please Login
