6
COOKING AND BLENDING
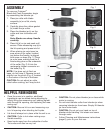
1. Place the motor base of your blender on a flat, stur-
dy surface. It is important that the surface be clean
and dry. Assemble the blender by following the
Assembly instructions (page 4). Once the jar is
assembled and is in position on the motor base,
plug the blender into an electrical outlet.
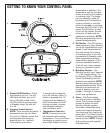
2. Press the On/Off button. The blender is now in
Standby mode.
3. Select the required time per the recipe. This can
be adjusted throughout the cooking process, but
a time must be selected to start the heater initially.
4. Add ingredients according to the recipe. You may
add more ingredients by lifting the measuring cup
from the lid and dropping ingredients through the
lid opening. When making soup, fill the contents
of the glass jar only to the 48-oz. level marked HOT.
Always replace the measuring cup after adding
ingredients. See Recipe Tips and Hints for cooking
soups (recipe book, page 2).
CAUTION: Do not put hands into blender jar with
blender plugged in.
NOTE: Do not use anything other than the measur-
ing cup to cover or close lid opening. This prevents
obstruction to necessary steam vents.
CAUTION:
When blending hot liquids ensure vents
in lid opening are clear and intended pour spouts
are closed (lid is secured).
5. To remove blender jar lid, lift edge of cover upwards.
Lifting from measuring cup will not remove lid.
CAUTION: Be careful of hot steam when removing lid.
6. To stir ingredients while cooking, use the Stir button.
7. When cooking time has finished, the blender will
beep 4 times.
8. To blend soup always start on speed 1, gradually
increasing to speed 2 or 3. Use only these recom-
mended speeds when blending hot items. Turn the
Blending control dial to stop when the desired con-
sistency is reached.
9. Unplug the blender from the electrical outlet. Never
remove the blender jar from the motor base until the
blender is off. Do not twist the blender collar from
the blender jar when removing jar from motor base.
CAUTION: When removing the jar use caution.
The area underneath the collar may be
extremely hot.
BLENDING COLD INGREDIENTS
1. Place the motor base of your blender on a flat,
sturdy surface. It is important that the surface be
clean and dry. Assemble the blender by following
the Assembly instructions (page 4). Once the jar is
assembled and is in position on the motor base,
plug the blender into an electrical outlet.
2. Press the On/Off button. The blender is now in
Standby mode.
3. Add all necessary ingredients to the blender jar and
replace the cover. You may add more ingredients by
lifting the measuring cup and dropping ingredients
through the lid opening. Replace the measuring cup
after adding ingredients. Do not put hands into
blender jar with blender plugged in.
NOTE: Add liquid ingredients first then follow with
solid ingredients. This will provide more consistent
blending and prevent unnecessary stress on the
motor.
4. To remove blender jar lid, lift the edge of lid upwards.
Lifting from measuring cup will not remove lid.
5. Turn the Blending control dial to your desired speed
or use the Pulse function. Turn the Blending control
dial to Stop when the desired consistency is
reached.
6. The Stir function can be used as well for gentle
blending.
NOTE: To dislodge food, do not use a spatula
until you have turned the blender off, use a plastic
or wooden spatula to help remove food lodged
around the cutting assembly. Replace the lid and
measuring cup and continue blending, if necessary.
Make sure the spatula is not inside the blender jar
before blending.
7. Unplug the blender from the electrical outlet. Never
remove the blender jar from the motor base until the
blender is off. Do not twist the blender collar from
the blender jar when removing jar from motor base.
CLEANING AND MAINTENANCE
NOTE: Jar collar with blade assembly is NOT dishwasher
safe. Do not submerge in water or other liquids.
CAUTION: Be extremely careful when cleaning
around the blades. They are very sharp.
Always unplug your Cuisinart
®
Blend and Cook
Soupmaker from the electrical outlet before cleaning.
The blender is made of corrosion-resistant parts that are
easy to clean. Before first use and after every use, clean
each part thoroughly. Periodically check all parts before
reassembly. If any part is damaged or blender
jar is chipped or cracked, DO NOT USE BLENDER.
Remove the blender jar from the motor base by lifting
straight up and away. Twist off the jar collar with blade
assembly by turning counterclockwise. Carefully remove
the rubber gasket.